Monday 28 February 2011

small changes

Not really much of an update that will come at the end of the week, today ive built a fountain i will be attempting to do a waterfall cascading down each tier into the pool at the bottom but for now its dry.


Friday 25 February 2011

quick recolour


the green sections will be a proper moss in udk its just a mask untill i create the moss
just redone all the wood so its not the deep red

Monday 21 February 2011

were going down the pub, Again

ok so i've taken the building into unreal it has no specular/normal maps or fancy shaders yet i was just getting the meshes in so i could start to think about camera angles, i've come up with a few i'm still going to need to build some filler meshes but then most of them will carry forward through each scene.

This is the angle that myself and dean dicussed a while ago with the hero building taking up the majority of the shot showing off the high detail modelling and normal maps i like this angle but it does kinda feel like something is missing.


This angle is another that i dont mind i would need to put a few more buildings on the other side of the pub but with some nice filler meshes this could feel like something you would see as a screenshot on the back of the box.


This is currently my favorite angle is shows the most of the buildings and some really good foreground meshes would set the scene and would look good when those meshes are carried through to the end image.

Sunday 20 February 2011

quite but not quite enough

So nearly done on the texturing of the hero building just the trim, base and roof to do so will get that done tomorrow at college, grunge will be added to the texture in unreal using a mask on the shader.

Friday 18 February 2011

ohhhhhh colour makes more work

So i started texturing today only to find out that i need to model in some small details on the bay window to hide the horrible join on the roof i also had to reunwrap that section just so i could get the tiles to line up correctly but so far nothing major and i will have that done tomorrow.

dont pay much attention to the blue in the windows as once i start the shaders in unreal there will be a reflected sky on the glass.


the house that jack built

So heres the final AO render you will see of this building.

I'm going to start texturing it now so hopefully i can fly though this and get it into unreal before monday.

Thursday 17 February 2011

will sombody fix that damned roof!...

its thursday its 6:15 its time for an update.

almost finished the hero building just the roof section to build now and maybe some kind of detail for the corners on the ground floor as at the moment they look a bit bland.


ive built a nice little window piece but i'm not sure if it fits the building will leave it there for now and get opinions off everyone on monday and go with the general consensus.

dont mind the seam down the center i need to paint that out

Wednesday 16 February 2011

artistic decisions


started working on the trim for the hero building today not sure if the side of the building should have the 2 crosses on the ends with the 2 windows next to each other or the 2 crosses in the center with a window each side then a cross section on each end?

ive built the 2 crosses on the ends for now but will do the other way tomorrow and see which i prefer.

ive also made the bay windows fit on a 128 block so that i can then use them on the modular buildings too and will probably do the same for the upper windows, it means i can use them in the later scenes too, especially the Victorian 1 where the architecture is very ornate.

Tuesday 15 February 2011

Updates and the wonderful world of mirroring

So working my ass off again today i finished the high poly of the bay window baked out my maps and applied them to the low poly for you guys to peruse. I have also built my window box for the upper floors and the door arch for the ground floor.


so heres the bay windows from high poly through to render of game ready.
yesterdays HIGH poly


the LOW poly


the AO not rendered


final rendered bay window


next up is the window box for the upper floors. i'll go into some detail on this 1 as i did things a bit different. I modelled my Low poly 1st and then split it down the center and deleted half then unwrapped that half before i started to add the high poly details such as the pattern on the side and the bars on the window. i then baked my maps out and applied a symmetry modifier to the model.

heres the HIGH poly model with all the gubbins


heres the low poly


symmetry added maps applied not rendered


final render


and now the boring bits heres the door i made


and all the pieces on the building rendered so you can get an idea of the final piece.


oh and before i forget ive fixed the textures in unreal i just need to redo my specular maps as they dont match across all the pieces. and i'm also starting to add grunge layers through unreals super powerful material editor.


thats me for today time to go play some games.

Sunday 13 February 2011

hero building

Started work on the main feature building or "HERO BUILDING" as I'm calling it.

The shot below will show the basic shape and the few details I've worked on so far.


I've made a nice small asset that will be used to give the upper floor lip some detail I've baked a high poly model down and created an Ambient and Normal map so far will texture it properly once the building is complete.


The high poly model stands at 2136 polys and the low at 104, and here it is rendered.


I've also made a bay window but I've only made the high poly model so far, i still need to take it into Mudbox and sculpt some details into the panels under the windows and the roof details although i might do the roof using the Photoshop filter.


And that's been my Sunday, well I did work on my terrain in Unreal a little bit but that's not worth showing off as it will be such a minor part of the scene only used to give the buildings something to stand on.

Saturday 12 February 2011

moving on...

after unreal doing what it does best (randomly crash) i had to re-import everything so none of the textures are assigned this time but 2 of the 4 background buildings are done.

the other 2 buildings will be on the otherside of the hero building so i will get a block out of that building done next then i can start to build the other bg buildings.

started the unreal bit


still got a few more bits to import and ive noticed theres a few bits that i didnt sort smoothing groups out on but things are working nicely in udk.

Tuesday 8 February 2011

everythings normal.........

......well almost.

I've spent today making specular and normal maps for the 3 texture maps i will be using for the modular pieces, i have completed all 3 specular maps but the normals are taking slightly longer than my usual work flow because i am painting in details by hand and not relying solely on the nvidia filter/crazy bump. i plan on having all 3 normal maps completed by the weekend then i can start to think about the hero building for this scene.

you'll notice across the images below that some areas dont have a normal map as i said above i only completed 1 so far but atleast it will help you to see what the normals are doing. its most notable on the roof tiles and the bars on the windows which aren't modelled in but the normal does a good job of faking it.


Monday 7 February 2011

bringing it together

So heres the test building in 3ds just need to work on the specular and normal maps for the 3 textures used then i can get the pieces into unreal and start "legoing" the background buildings together.


Thursday 3 February 2011

lesson learnt

modular building is awesome and well worth taking the time to plan it out 1st, getting your texture on the grid so that in max its on the grid which means in unreal (or any engine) it'll be on the grid works so well but as i found out today make sure you do your maths and make your textures the right size when taking then into max.

i made my textures at 4096 so that i could have them extra crisp for max renders but i also made all my modular pieces from that 4096 texture sheet so in case you haven't cottoned on yet my models are HUGE, in the picture below the little green box next to the door is 96 units high (an unreal character) scales a bit off huh.

Wednesday 2 February 2011

modular building blocks

right so the 1st set of modular building blocks are complete i have another sheet like this to make that has the likes of doors and more variants of the wall pieces that i will get done tomorrow then i can start building the actual houses and work out the roofs which will be a bit harder as theres going to be some weird angles to work out but hey i'll figure it out pretty quickly.


heres how i got to this point

1./ i spent a day working out what pieces i would need, things footings, lower wall section, dividers, upper wall sections, roof wall sections.

2./ i then drew on a piece of paper and plotted a basic idea of where each piece would live on the texture sheet, which i followed when creating the image below. (the black area on the image will eventually house something i just dont know what yet) when creating the texture i set my grid in photoshop to 32 pixels so that everything in 3ds will align on a 32 unit grid and again will align in udk.


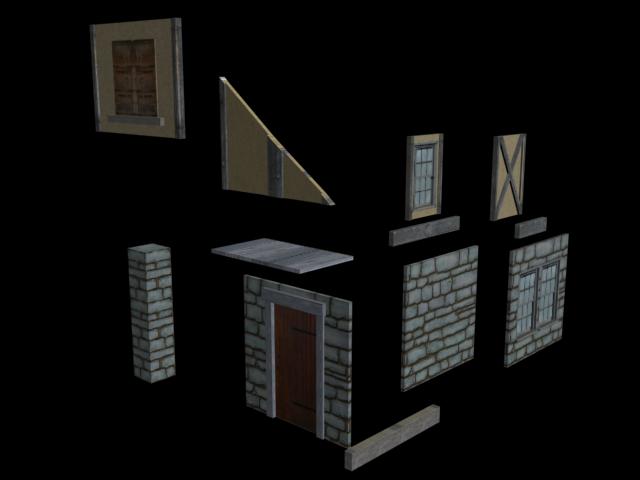
3./ once the texture was finished i applied it to a plane in 3ds and started to cut the plane up into each individual piece.

4./ i made each individual piece 32 units wide (which i know is way too thick for a wall in a game engine but once i have everything how i want it i will start to resize for udk) to make thepiece 32 units i just extruded the piece and capped the hole in the back.

5./ i then started to cut in details and extruded then out (or in depending on what needed to be done) i then had to uvw map the extrusions to clear up the stretching from the new polys i had created.


6./ i now have to reset the pivot points so that every pieces pivot was on the bottom left rear vertex and then center the piece to the world origin in max so that each piece will snap together snuggly. (i havent done this bit yet the next image i just aligned everything by eye but i dont want to do that for the actual scene)


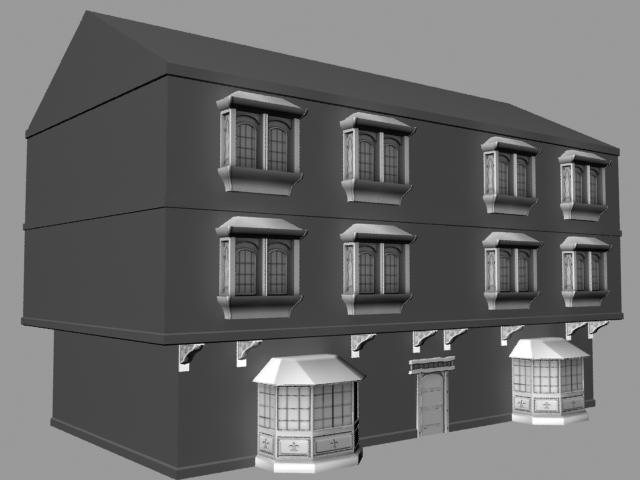
and thats the final modular facade, it works quite nicely and given there are no normal or specular maps in the scene at the moment the details i cut in are doing the job quite nicely so i will only have to create normals for the smaller details such as the bricks and bars on the windows.